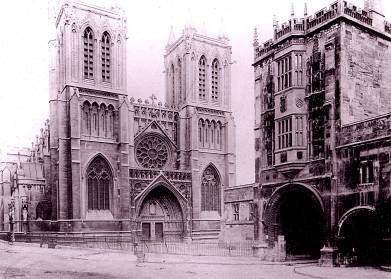

Bristol Cathedral: Abbey Gatehouse: North Side and Tower Report on cleaning and conservation works
2004. Nimbus Conservation Ltd.
Contents:
- Overview and methodology
- Cleaning: general
- Cleaning and
repair: specific elements
- Sheltercoating
- Anti-graffiti treatment
- Overview and methodology.
It is not the purpose of this report to discuss in detail the architectural significance, build history or geological history of the stonework of the Abbey gatehouse. These will be dealt with elsewhere, by others in more detail. It is sufficient to say here that the Abbey gatehouse as it stands at present is the result of several periods of dismantling and rebuilding, that it retains significant elements from each rebuild and because of this provenance contains more than one stone type and varies in condition depending on the age and type of stone used. Significant numbers of Jacobean/Elizabethan elements of carved stonework (Tudor roses/Niche canopies, statuary and niches) remain, rebuilt into the major refurbishment, which took place at the beginning of the Twentieth century. The lower main arch and smaller arches and the passageway arcade and vaulting are of Norman origin and are in generally remarkable condition.
The programme also allowed for the removal of cement pointing from the tower and repointing in hydraulic lime mortar, also tower cleaning to remove sulphation and algal staining, repair to decayed elements and repainting of rainwater goods.
Also included in the programme was the cleaning and conservation of the modern office range.
Methodology throughout was of minimum intervention. Cleaning methods were chosen to cause least disturbance in shortest time. The object of the general clean was not to reveal bare stone, but to remove damaging sulphation from sheltered areas and loose surface dirt and mosses from the face of the stonework overall. Plastic repair where undertaken was used to fill voids and prevent water/frost traps. Where ornamental areas were subject to plastic repair no attempt was made to repair back to the original line, where necessary the line was suggested to give the repair coherence.
During cleaning great care was taken to avoid the removal of tool marks, masons marks, alignment marks and polychromy.
2. Cleaning: general
2.1. Cleaning Trials.
Cleaning trials were part of phase 1 of the works to the South Elevation and discussed in a previous report
2.2. Cleaning of North Elevation, Tower and office range
Once again cleaning was undertaken using a combination of timed nebular spray and ammonium carbonate poultice, the methods from the trials that were regarded as the most cost effective and efficacious.
Examples of
sulphation on carved areas of stonework
Shows poultice
applied to statue and left to dwell for 24 hours.
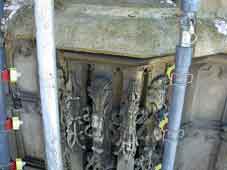
Shows timed nebular
spray cleaning to niche canopy
2.1.2. General Cleaning.
Dirt was removed from the entire surface of the elevation using a domestic power washer with a lance set to low volume and low pressure. This removed loose surface dirt but did not clean down to the bare stone surface which was thought to be undesirable. Mosses and algal growth were mechanically removed with wooden spatulae and fine stainless steel bristle brushes
2.1.3. Sulphation in sheltered areas.
Where sulphation growth was quite thick, the bulk was removed mechanically. This process was followed by several (where necessary) applications of the ammonium carbonate poultice described above. Ammonium Carbonate poultice constituted of 10% Ammonium Carbonate in water, bulked up with Technofil paper pulp and sepiolite clay. Poultices were left to dwell on the surface for 24 hours and repeated if necessary
2.1.5.Norman arch and smaller arch.
Cleaned throughout using ammonium carbonate poultice.
2.1.6. Larger sulphated areas
These were cleaned using arrays of timed nebular sprays, set according to prevailing weather conditions to keep the surface damp but not running with water. The surface was pressure washed and scrubbed at intervals to remove softened soiling
3. Cleaning and repair: Specific elements.
3.1 Pointing to Tower
Cement pointing was cut from the tower using an angle grinder to cut a chase down the middle of the pointing and then breaking it in upon itself. The tower was repointed in a mix of 1 part hydraulic lime (nlp 3.5) to 2.5 parts Chardstock sand/1 part Cotswold stonedust/1 part fine yellow sand supplied by HJ Chard
3.2. Pointing to high-level chimneys and cupola.
After careful raking out of cementitious and failed mortars, the open joints were repointed using a mix of 1 part fine yellow sand, two parts of sharp sand and 1 part of hydraulic lime. Hydraulic lime was used to give the mortar strength in the face of extreme weathering conditions.
3.3. Plastic repair at high level.
Instituted into water traps and hollows on the chimneys and cupolas using various mixes of the three sands (Chardstock, fine yellow and sharp pit sand) in proportion of 3:1 with hydraulic lime. Sands used in different combinations depending on the depth and size of the hollow to be filled.
3.4. Pointing to north elevation.
Narrow joints pointed with 3:1 aggregate:lime putty. Aggregate a mix of fine yellow sand and sharp pit sand.
Wider joint pointed with a 3:1 mix of Chardstock sand and lime putty.
3.5. Plastic repair to elements of north elevation.
All executed in 3:1 aggregate to lime putty mix. Aggregates a mix (depending of stone type and texture of Guiting stone dust, fine yellow sand, brown sharp pit sand and Chardstock sand.
In all cases of pointing and plastic repair the joint or hollow was prepared for pointing/repair by removal of extraneous matter and thorough soaking prior to institution of pointing/repair. All repairs kept damp for some days to prevent premature drying and assist carbonation.
3.6 Statuary and carved elements: Cleaning and repair
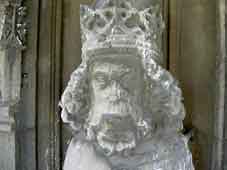
3.6.1. Eastern Statue and niche at high level: Cleaning and repair
Statue of a king (crowned) of possibly Jacobean provenance. Much decayed and repaired. Old cementitious repairs cracked and hollow, some repairs in possibly Roman cement in better condition. Lead band of unknown purpose, possible as anti-algal device, fitted around king’s forehead.
It was decided to unpick previous cement mortar repairs and leave sound Roman cement repairs. All repairs found to be armatured using bronze dowel, which was retained to give a depth gauge to the new repairs. Repairs unpicked by gentle tapping to loosen cement bond.
Possible Roman cement repair Old cement repairs
![]()
![]()
Eastern statue at
high level prior to repair
Repair proceeded in layers of lime putty based mortars after 40 plus flood coats of lime water. The layers were built up on the original armatures and ceramic Nimtees where necessary. Layers were of no more than 10mm and each layer was allowed to carbonate before the application of the next. Each layer was scored to give a key to the next.
It was not attempted to recreate the statue to its projected final surface. The repair was to a decayed line suggested by existing original surfaces. The repair was placed in such a way as to be obvious to close inspection but to merge with the old materials to the distanced eye.
Repair mixes were made from lime putty, Chardstock sand, coarse Cotswold dust (4mm down), fine Bath stone dust (1mm to dust) and fine yellow soft sand in a proportion of 1 part lime putty to three parts aggregate without the introduction of any excess water. Mixes were beaten and chopped until the putty was completely mixed with the aggregate.
Two to three days were left between coats with the statue damped and covered to prevent premature drying and to allow for the onset of carbonation of the calcium hydroxide.
Pigeon netting Extent of new mortar repair.
![]()

![]()
![]()
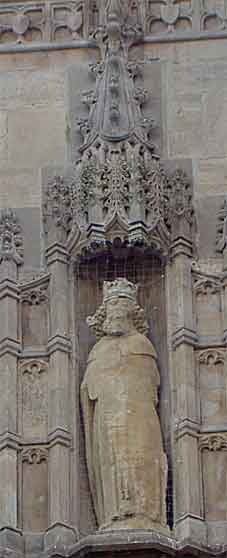
High-level east
statue after conservation.
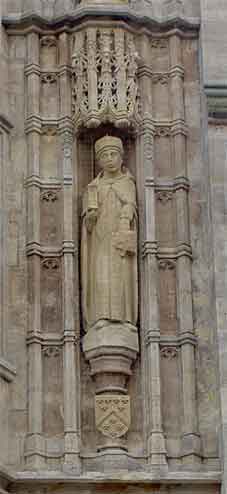
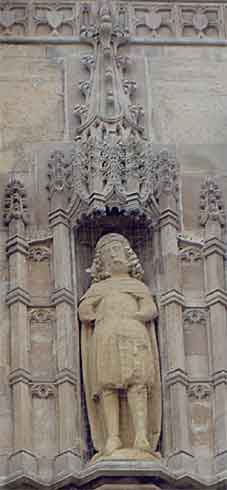
3.6.2.Western Statue at low level:
Cleaning and repair
This is a statue of bishop or prelate. Some suggestion that the head, in better condition was a new addition. The figure is holding a purse in one hand and a building in the other. The hands were very much decayed and most of the building held in the right hand. The stone is oolitic of local, possibly Bath, origin.
The statue and niche and canopy were cleaned using Ammonium carbonate poultice and timed nebular sprays and all previous cement repairs were removed by careful unpicking to avoid damage to the original substrate.
Area of cement repair Subsequently removed

Western statue at
low level head prior to cleaning and repair.
After removal of cement repairs and in discussion with Louise Bainbridge it was decided to rebuild to a conjectured line the building the statue holds in it’s right arm, as well as building up the collar and right foot in order that the statue would read better from the ground. These repairs were placed using the same mix as described above using Nimtees as armatures. Before repairs were instituted the statue was flooded with 40 plus coats of limewater to consolidate the surface.
Area rebuilt in lime mortar on Nimtee
armature
![]()
![]()
![]()
Western statue at
high level post repair and cleaning
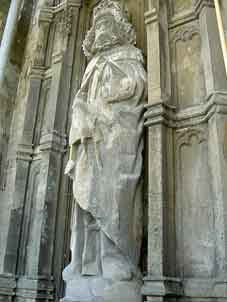
3.6.3 Western Statue at high level: Cleaning and repair
Another king, dating from the same period as it’s Eastern neighbour. Badly weathered and sulphated with some inappropriate cement based mortar repairs. Missing the lower arms and substantial facial detail notably the chin. The statue was first cleaned of guano which had built up in the cavity behind. This cleaning applies to all statues. The guano was wetted to avoid dust inhalation. Cleaning took place using Ammonium carbonate poultice and intermittent timed nebular sprays. Inappropriate cement based repairs were carefully unpicked and the cleaned statue was treated with 40 plus coats of limewater to consolidate friable surfaces. Lime based grouts consisting of lime putty, fine stonedust, fine sand and casein were introduced into fissures and blisters.
Western Statue at
high level during poultice based cleaning: head and shoulders.
Western statue at
high level during nebular cleaning: torso and upper legs
Repair was instituted to water traps and the arms were remodeled to the upper sections to a decayed line to suggest the original. The repairs were formed on Nimtee armatures in the mortar mix described above.
Mortar repairs

![]()
![]()
Western statue at high level after cleaning and repair
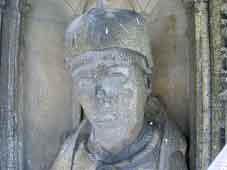
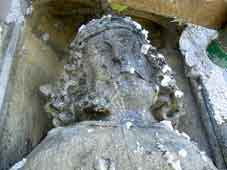
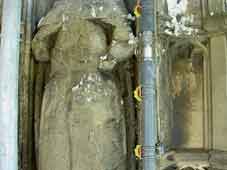
3.6.4. Eastern Statue at Low level: Cleaning and repair
Another crowned and caped king, also missing lower arms but with less cementitious repair and in better overall condition that the statues on the upper level. Facial detailing and drapery in good condition.
This statue was cleaned with its surrounding niche of guano and then the small number of cementitious repairs were carefully unpicked. Soiling was removed with the dual approach of Ammonium carbonate poultice and timed intermittent nebular sprays. The statue was then treated with 40 plus coats of limewater to consolidate the friable surfaces. Fissures and cracks were treated as has been described above.
Eastern statue at low level prior to cleaning. Head and
crown
Eastern statue at low level prior to cleaning: entire

Eastern statue at low level after cleaning, repair and
sheltercoat.
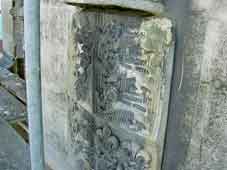
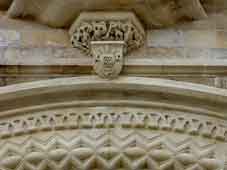
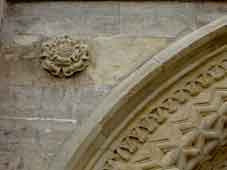
3.6.5. Other sculptural elements: Cleaning and repair
Several Tudor roses in oolitic limestone, one surmounted by a crown, several coats of arms and a relief inscription at lower level decorate the North façade of the gatehouse. The lower coats of arms are of more recent origin, along with the inscription, that the other elements.
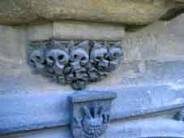
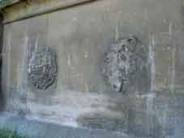
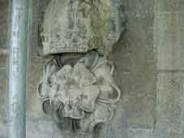
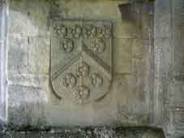
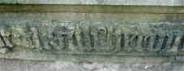
Various carved elements prior to cleaning.
Other sculptural elements to this elevation were cleaned in the same way as the statuary using a combination of Ammonium Carbonate poultice and timed intermittent nebular sprays. All friable stonework was flooded with 40 plus coats of limewater prior to being, where necessary, repaired with lime plastic repair. Cracks were grouted with a slurry of lime, casein and stonedust.
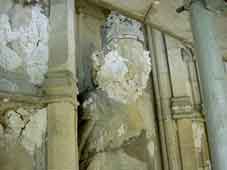
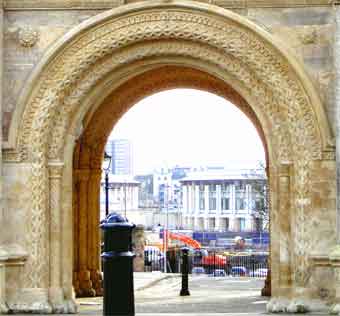
3.6.6 Main Norman Arch: Cleaning and repair
The Archway is in remarkably good condition for its age. It is constructed from oolitic limestone
It was, however, badly blackened with soot and sulphation, caused probably exhaust fumes from the main road which until relatively recently ran alongside the gatehouse. There were some areas of cementitious repointing and repair, but in general the detail of the stonework was excellent excellent, crisp and with mason’s and location marks still clearly in evidence. These marks were documented by the architectural historian and archeologist, Warwick (?). The pointing which was lime based showed that the arch was part of the original build and had not been dismantled and rebuilt in modern times.
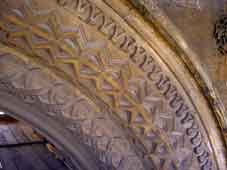
Main Norman Arch
prior to cleaning and repair
The arch was cleaned using the usual combination of techniques. Cleaning was very successful and the surface beneath the dirt was crisp and mostly in good condition.
Subsequent to cleaning the arch was consolidated with limewater, cement repairs were carefully removed by tapping to loosen the bond and chipping out. Fissures were grouted with a lime, casein and stonedust slurry and all open joints were repointed using a mortar mix of lime putty, fine sand and stonedust.
N. Main Archway after cleaning and repair
Large weathered and hollowed out areas to the bases of the columns were repaired in layers with a mortar mix consisting of Lime putty, Chardstock sand, fine yellow sand and stonedust. These repairs were cut back to suggest a decayed line.
Cleaning revealed much decay to the LH of the hoodmould. This was repaired to create a working weathering using hydraulic lime in place of lime putty but with the same aggregate mix as above.
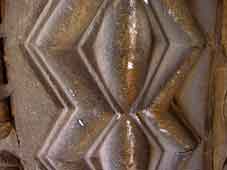
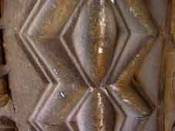
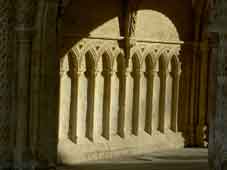
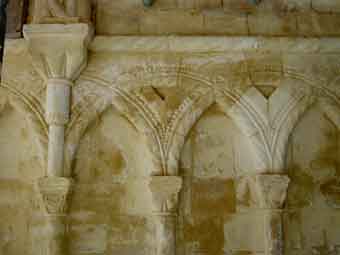
3.6.7. Arcade, vaulting and main
passageway: Cleaning and repair
This beautiful passageway had long suffered from being dirty and the target of scratched and other graffiti. It is contemporaneous with the north and south archways bearing similar mason’s marks and in some cases at high level on the vaulting traces of original polychromy. The vaulting of the ribs terminates in stone bosses. The web between ribs is of plastered stone, some of which is in lime plaster and a proportion in recently repaired gypsum work. These areas are painted throughout in modern vinyl emulsion. The blind arcade consists of a row of interlocking decorated Norman arches underneath a central corbel bracket from which the vault springs.
Considering the age of the stonework it is in fine condition. There is some deliberate damage, caused by graffitists and some accidental, owing to the collision of wagons etc with the sides of the passage. Other damage has been caused by the natural weathering process. But in general the decoration and structure reads well.
The arcade was cleaned using intermittent nebular sprays. The spandrels and vault ribs were cleaned using Ammonium Carbonate poultice. Cleaning revealed lacunae and friable areas, missing pointing and the above-mentioned mason’s marks and polychromy. The arcade was repointed and large declivities filled. Mortar mixes were as above.
Loose paint was removed and the ceiling was washed down with sugar soap prior to being repainted in white Dulux Supamatt in three coats. Stripping the modern vinyl paint and replastering/repainting using lime mortars and limewash was considered but dismissed owing to cost considerations.
All unnecessary ironwork, rusting nails, unused brackets etc were removed and holes filled. Pintles of the original gates were left in-situ, treated with Fertan rust converter and painted in black gloss paint.
The electricity supply, run in iron conduit, light fitting and junction box with timer to the north end of the passage were removed to ground level.
Sheltercoating and the anti-graffiti treatment of the arcade will be dealt with in a later section of this report.
3.6.7 Minor archway and passage: Cleaning and repair
The minor archway was in similar condition and of the same build period as the larger. It was cleaned and conserved internally and externally using the same techniques as the larger arch.
The passage way is constructed of random rubble walls with a flat ceiling, which includes an access hatch to the room above. On the western side there is a blocked doorway with a four-centered arched head. The infill is in the same random rubble as the rest of the walls.
The pointing of the walls varies from sound lime mortar to modern ‘black mortars’. It was necessary to depoint areas of the wall where the pointing was lost or friable. Repointing was done in a lime putty:chardstock sand: fine yellow sand: stonedust mix.
As with the major passageway all unnecessary ironwork was removed and the holes filled to match the surround, either stone or pointing. Iron fittings that were left in-situ were rust treated with Fertan.
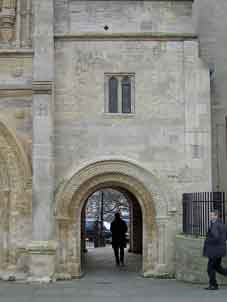
Minor arch after
cleaning
3.6.8. Ashlar and other architectural elements: Cleaning and repair.
Cleaning of the stonework limited to the removal of mosses from horizontal surfaces and sulphation and loose surface dirt from under sheltered areas where soot collects, and areas which are not water washed by rain. All cleaning undertaken using methods described above and starting from the top of each elevation worked on and working down to ground level.
After cleaning, failed or unsuitable pointing and cement repairs were removed and all repointing undertaken and mortar repairs of hollows and cracks undertaken.
3.6.9. Windows: cleaning and repair.
All window surrounds were cleaned using Ammonium carbonate poultices to minimize the likelihood of water penetration through gaps in window frames. Failed stonework was mortar repaired, deep repairs armatured using ceramic Nimtees.
Bronze window frames were repainted in two coats of the specified black gloss paint.
3.6.10 Rainwater goods and window
grilles.
Rubbed down and painted with specified undercoats and two top coats.
4. Sheltercoating.
All carved ancient elements of the building that fell into the scope of these works were sheltercoated to protect their surfaces from weathering by forming a sacrificial layer and filling pores and minor cracks and water traps. The sheltercoat was painted on and rubbed off the surface whilst still wet with hessian rags. The sheltercoat consisted of sieved lime putty mixed with casein(10%), with a fine aggregate consisting of 1mm down sieved Guiting dust and fine yellow sand. To create sufficient depth of colour earth pigments Burnt umber and yellow ochre were used as well as a small quantity of crushed and sieved charcoal. Two layers of sheltercoat were applied to most elements, and three coats to the lower parts of the arches and the arcade used as a substrate for the subsequent anti-graffiti treatment.
5. Anti-Graffiti Treatment
The main arch passageway was felt to be a target for vandals and graffitists, presenting a tempting new, clean surface. Traditional anti-graffiti treatments tend to be oil based and non-porous and therefore not suitable for such a fragile historic stone surface. Alternatives were sought in liaison with English Heritage and Louise Bainbridge. A polysaccharide sacrificial coating PSS 20 was chosen. PSS 20 is a mixture of polysaccharides, 1.30% with a neutral cleanser 0.01%, sodium bisulphate 0.05%, and methyl paraben 0.10% in water. The PSS 20 used in this test is soluble in warm water.
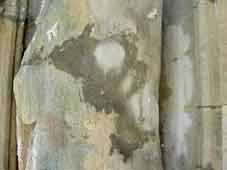
Firstly, the wall surfaces and the archway up to capital height were given a third coat of sheltercoat as an added sacrificial layer should the anti graffiti coat have to be removed because of discolouration or other problems. This was allowed to dry and carbonate for three weeks. Some efflorescence was noted and the dry salts were brushed away and did not reappear.
Efflorescent salts
![]()
When the wall was judged to be as dry as possible, PSS 20 was applied by airless spray. Prior to the application the wall was thoroughly dampened to avoid over absorption of the anti graffiti treatment into the surface. PSS 20 was applied in three coats over two days.
At first the treatment appeared to discolour the wall surface, but after a period of one week the wall returned to it’s normal, sheltercoated colouration with no evidence of glazing.
To date no graffiti has appeared and the anti-graffiti treatment has yet to be tested. Should graffiti occur, the wall should be lightly sprayed with warm/hot water until the surface coating dissolves and is washed away along with the graffiti. The PSS20 must then be reapplied to provide further protection.
Rene F. Rice for Nimbus Conservation Ltd. December 2004